
Top!
Update: Top! is now defunct, but it has been instrumental to my programming journey, and has set me on the path of my later temporal human-machine interaction research. In this way it is a precursor to my work on Quadrant. It is also what prompted my forays in vector graphics rendering.
Top! is a cuelist-based audio player geared towards show control for live performances. It allows organizing the sounds of a performance into a structured and flexible cue-list, to add DSP effects and mix sounds to multiple audio outputs, in order to create a rich sonic experience, easy to tailor to each particular performance.
As a sound engineer by trade, I had numerous opportunities to work on shows that had to integrate soundtracks and audio effects with live action on stage. Most of the times I found myself a bit frustrated by existing software, especially when it comes to the interactions with the performers on stage. Broadly speaking, I find currently available solutions to be lacking flexibility in one of these respects:
- Either they keep a strong synchronization between sound cues but don’t adapt well to normal variations of live shows (standard sequencers and DAWs fall into this category)
- Or, they allow manual or semi-automatic triggering of cues but loose synchronization, making it difficult to rehearse complex sequences starting from an arbitrary time (most samplers, DJ’ing tools and other cue-based softwares land on this side).
- Additionally, their user interfaces are often either bloated with features that I find useless, or lacking features that I would like to have, such as fast keyboard editing and navigation.
With this in mind, I decided it was time to devise a new solution allowing to synchronize sounds into complex and nested sequences, but at the same time provides the level of flexibility necessary to smoothly integrate into the design and rehearsal process, as well as the possibility to adapt the execution of the cuelist to the live variations of the performance.
How it works
Top! is based on “Cues”, each of which correspond to some event or action happening during the course of the show. For instance it can be a punctual audio effect, or a long soundtrack covering an entire scene, or a fade between two ambiances, and so on… Cues can be triggered manually, or automatically start and stop according to a certain pre-established timing scheme.
Top! interface is composed of a menu bar and three views : the cuelist, the cue view, and the matrix view. The idea is that all you have to deal with during a live show is readily under your eyes, with no tabs or separate windows to shuffle through to find the relevant info.
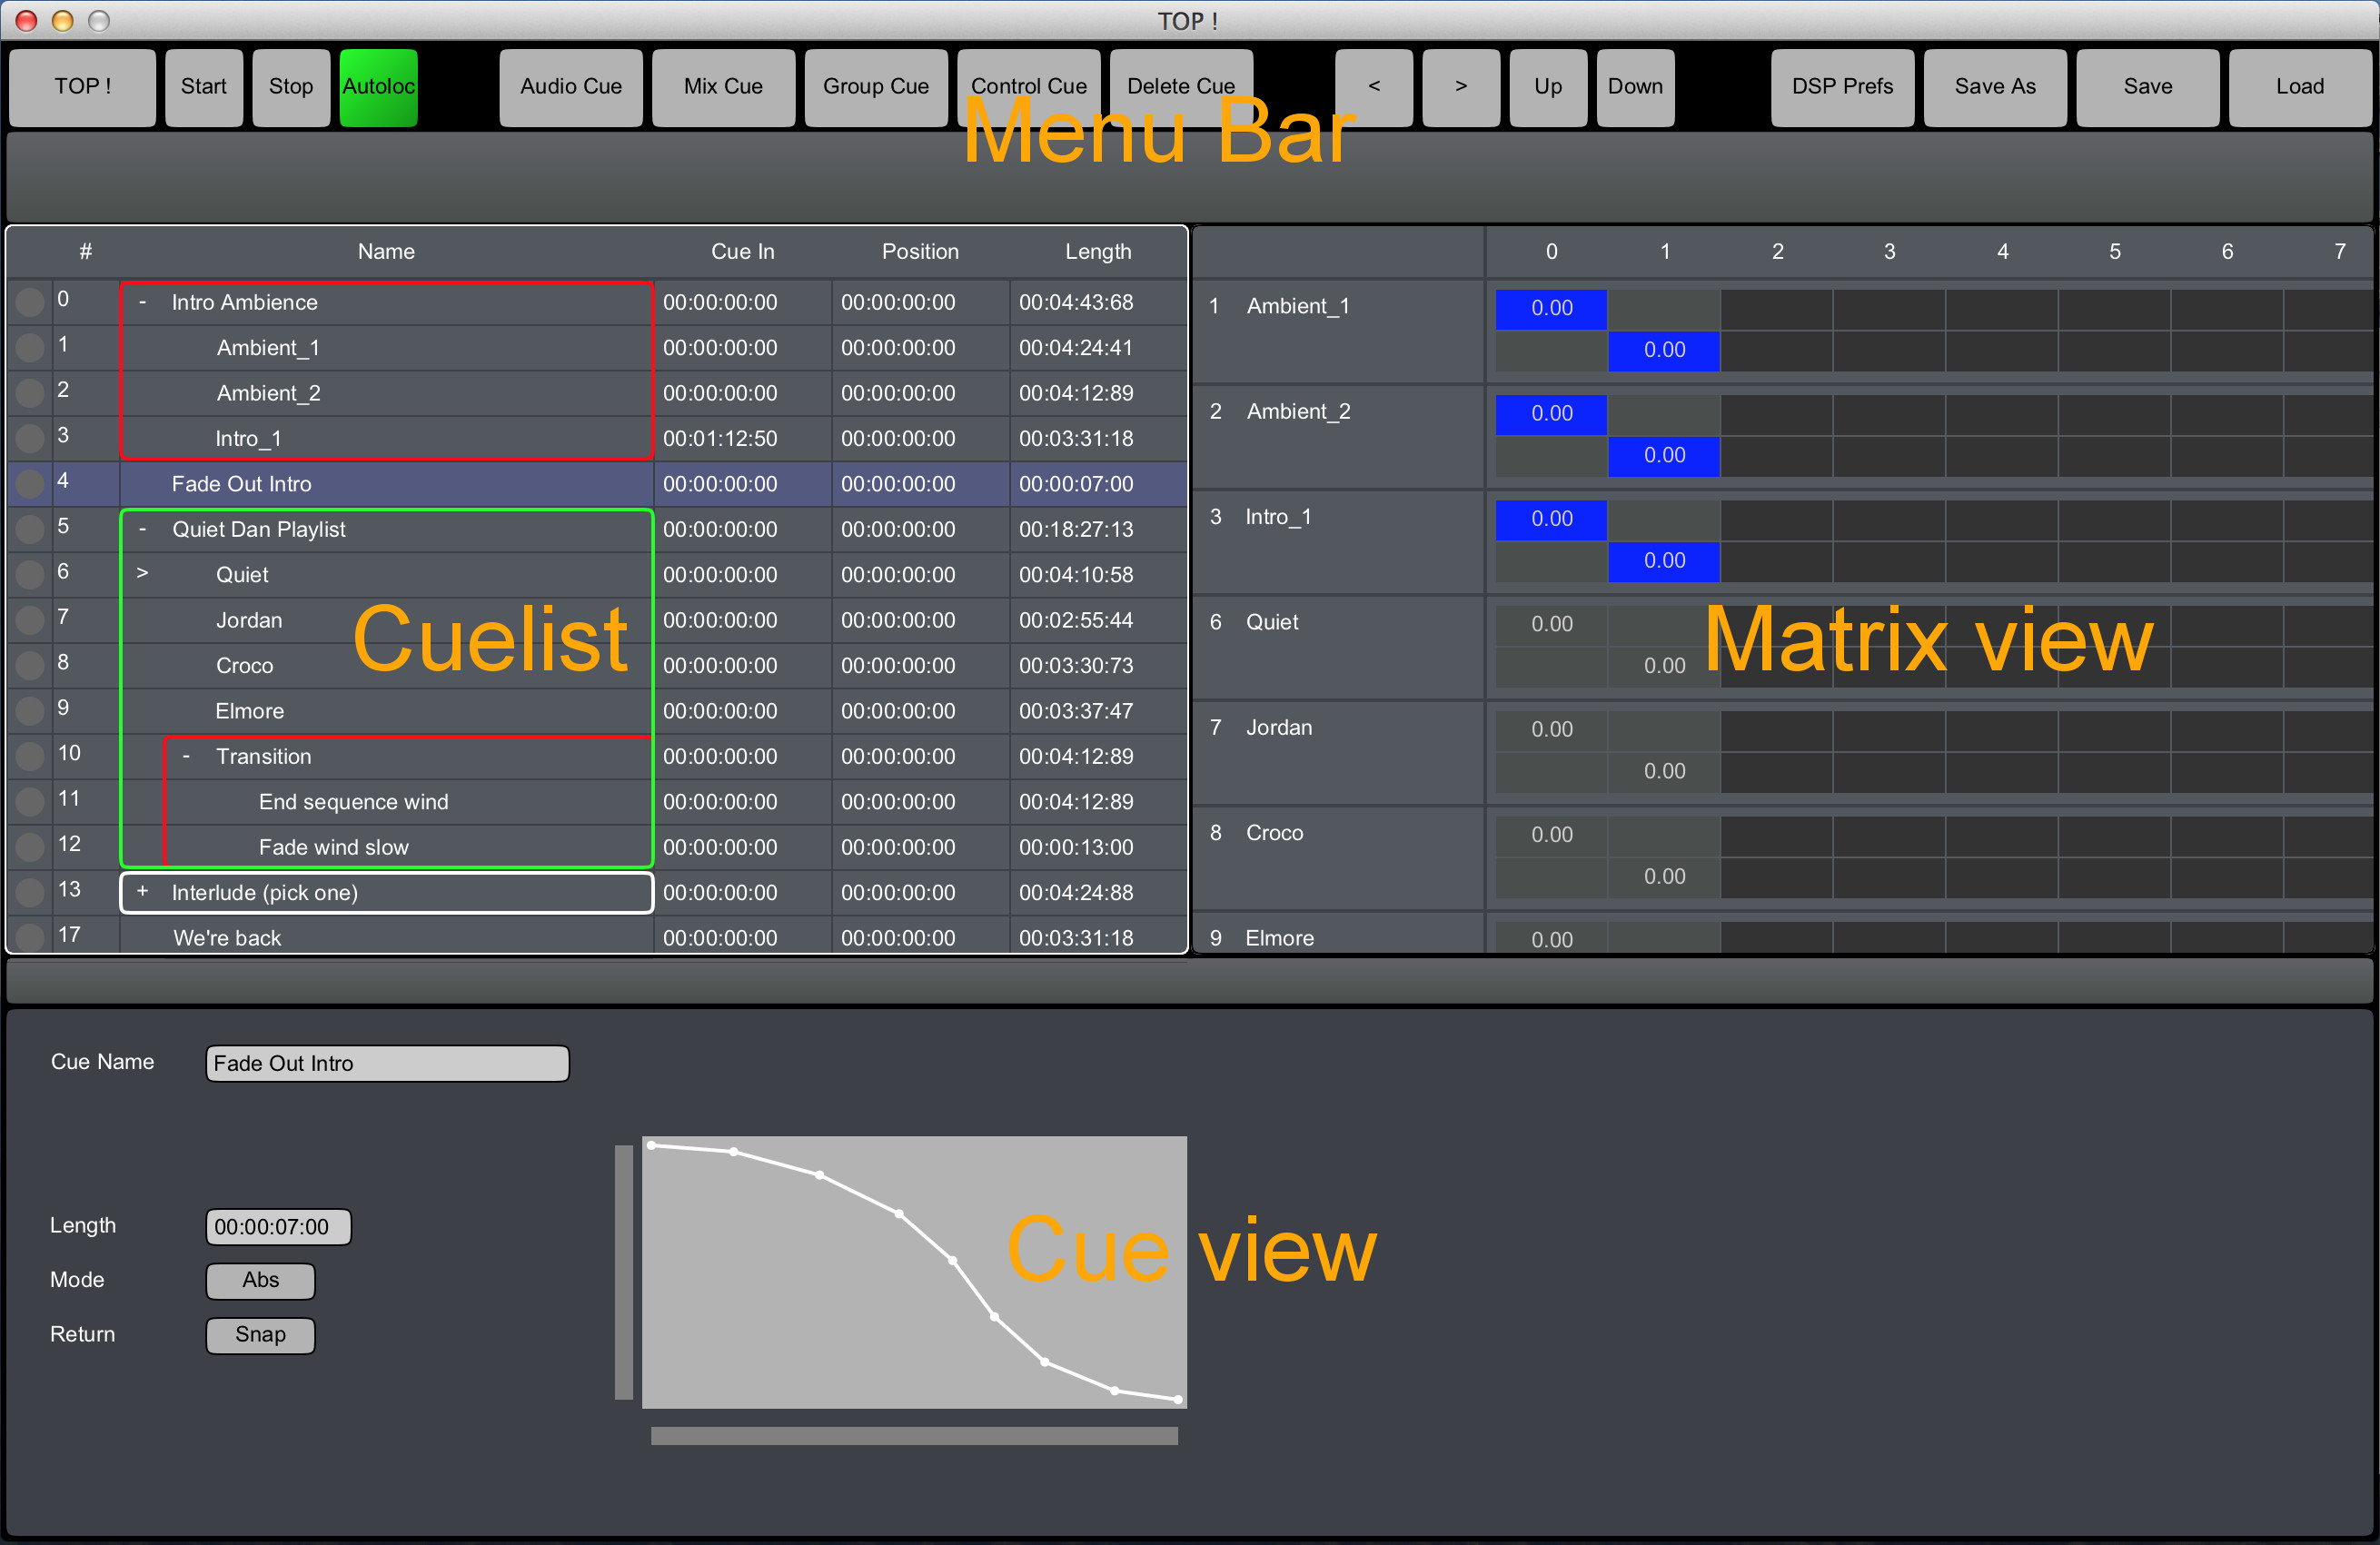
At any time, one of the three views (the cuelist, the cue view or the matrix view) has the focus, meaning that this view will receive and interpret keystrokes. The same key can have a different meaning in different views : for instance, the arrow keys are used to select the next or previous cue in the cuelist, or to move the cell selector in the matrix view. The currently focused view is indicated by a white outline. You can change the focused view by clicking on a view or by pressing the tab key to cycle through the views.
1 - The Cuelist
This area shows a list of the cues in the session. One cue can be selected to show detailed settings of that cue in the cue view. The selected cue appears highlighted in the cuelist. You can select a cue by clicking on it, or by using the < and > buttons in the menu bar or pressing the up or down arrow keys to navigate the cuelist. You can also move the selected cue by using the Up and Down buttons, or by pressing up or down arrow keys while holding the Control key. Precious status and timing info is displayed in several columns :
The status indicator shows a symbol indicating the current state of the cue :
- A red circle means that the cue is invalid or broken. It can happen when an audio file has just been created but no audio file is yet loaded, or when the selected file could not be loaded because it no longer exists, is corrupted or has an unknown format. It can also happen if a control cue has no target cue to control. When a cue is invalid, it will simply be ignored when instructed to play or stop.
- A green circle means that the cue is valid and ready to play, but it is currently idle.
- A green triangle is displayed when the cue is currently being played.
- When the status indicator is circled with a blue ring, it means that the cue is in a “floating” state. We will come back to this later when we examine group cues and transport synchronization.
- A green “H” means that the cue is “holding” its state, and is waiting for another cue to finish playing to return to and idle state. It happends when a mix cue has reached the end of its mix curve, but is keeping its level constant until the cues that it controls finish playing.
The Cue Number shows the order of the cue in the cue list. The numbers do not necessarily show up as continguous because some group cues may be collapsed, hiding the cues they contain, but ultimately the numbers are contiguous and furthermore the cuelist is renumbered each time a cue is inserted or removed. Thus it is not a unique identifier of the cue, but merely an indication of “how far” the cue is in the cuelist.
The collapse button shows up only on group cues, as a + or - sign. It is used to hide or show the “children” of the group, ie. the cues that the group contains. You may action it by clicking on it or by pressing Enter when the cue is selected.
The playlist selector is displayed as a > sign inside group cues that are in playlist mode (we will come back to this later). It shows the currently selected cue of the playlist.
The Cue Name is a text field where you can enter the name of the cue. Cues are auto-named based on their type and settings until you enter a custom name or save and reload the session. You can quickly rename the selected cue by pressing N and typing the name, then pressing Enter.
The Cue In counter is a time counter (showing hours, minutes, seconds and hundredth of seconds), that can be edited to specify the starting point a the cue relative to the start or its parent group, when the parent is in timeline mode. We will come back to this later when we study group cues.
The Position counter is a time counter that shows the elapsed time from the begining of the cue.The background of this counter shows a progress bar that gives an instant notion of where the play position is relative to the total length of the cue. When the cue is playing that bar is green, and it is light gray when the cue is idle. You can edit this counter to manually set the position of the play head when the cue is idle.
The Length counter is a read-only time counter that shows the total length of the cue. The length displayed for a group cue depends on its children and on the mode the group cue is in, so we will precise that later.
The selected cue will receive transport commands when transport buttons are clicked or when a transport keystroke is issued :
-Play (or Alt-Space) will start the selected cue.
-Top ! (or Space[/b]) will start the selected cue and select the next visible cue.
-Stop (or Ctrl-Space) will stop the selected cue.
The Autoloc button controls the behaviour of the position counter when a cue is manually stopped. When switched on (green-lit), the counter automatically returns to the point where it was when the cue was started. If off (dark grey), the counter will stay at the position it was when the cue was stopped.
2 - The matrix view
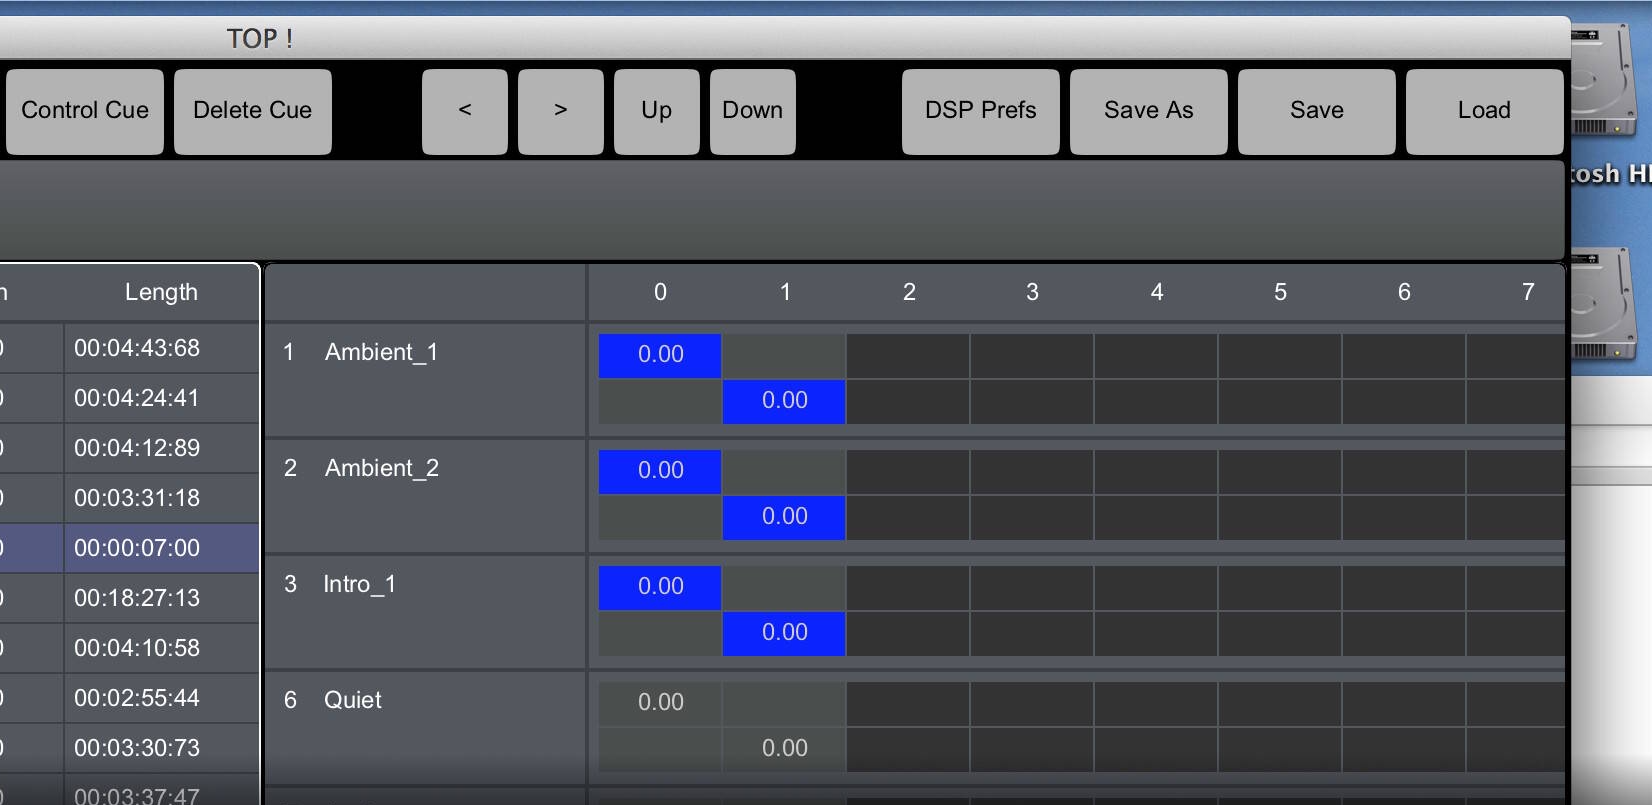
Each audio cue has an output matrix, which appears in the matrix view as an array of cells, and is labeled with the number and name of the cue. Lines of that array correspond to channels of the audio cue (i.e the matrix of a cue loaded with a stereo audio file will have two lines). Columns correspond to Top!’s output busses. Thus cells indicate which amount of audio of a particular channel is sent to a particular bus. This amount is expressed in a clipped decibel range from +6dB to -100dB, where 0dB corresponds to 100% of the audio sent to the bus, and all values below -100dB are considered equal to -inf dB meaning no audio sent to the bus.
One of the cells can be selected, which is indicated by a grey outline, by clicking on it or by pressing the arrow keys to move the selector. When a cell is selected it will receive numerical keystrokes and store the resulting value when Tab, Enter or an arrow key is pressed. You can also click on a cell and drag the mouse up or down to set the value of this cell.
The cells of some busses may be dark grey: it happens to indicate that these busses are not active and do not match with an audio output of the current audio interface. Indeed, you can have more (or less) busses than the number of outputs of you interface. You wont hear those busses, but you can edit them, for instance to prepare the session before moving to another system with more outputs.
3 - The cue view
The cue view shows all the settings of the selected cue (remember that it’s the cue that is highlighted in the cuelist). Its content thus depends on the type of cue, so in the following paragraphs we give an overview of each type of cues and its functions. A feature that is common to all types of cues is the Cue Name textfield, that allows you to edit the name of the cue just as the Cue Name field in the cuelist.
3.1 - Audio Cues
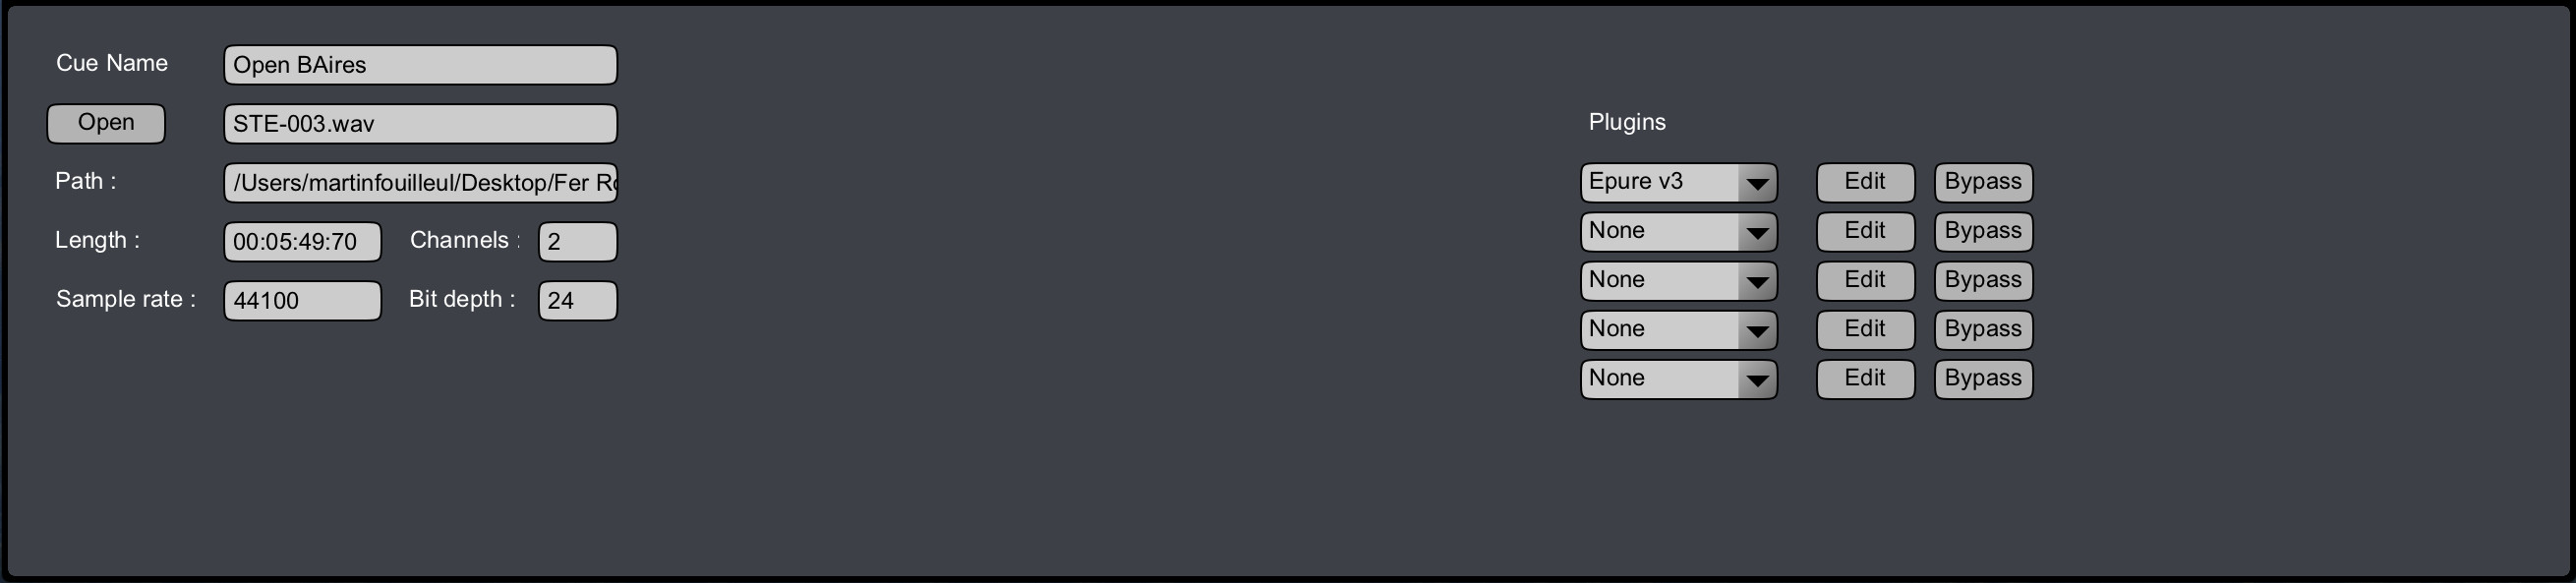
The purpose audio cues is to play back audio files. A file can be loaded by clicking on the Open button and choosing a file (currently WAV or AIFF only) in the dialog window. The name of the file and its complete path is then displayed in the subsequent text boxes, as well as its length, its number of channels, its sample rate and its bit depth.
To the right of the cue view is a number of plug-in slots. These slots allow you to insert and edit third party plug-ins to process the sound and add effects to you cues. The slots are chained, meaning the input of one slot is the output of the slot above it. The pop-up menu of each slot shows the list of the available plug-ins on your system, in which you can select a plug-in to fill the slot. Once a plug-in is loaded in a slot, you can click the Edit button to open a plug-in editor window, in which you can tweak the various settings of the plug-in.
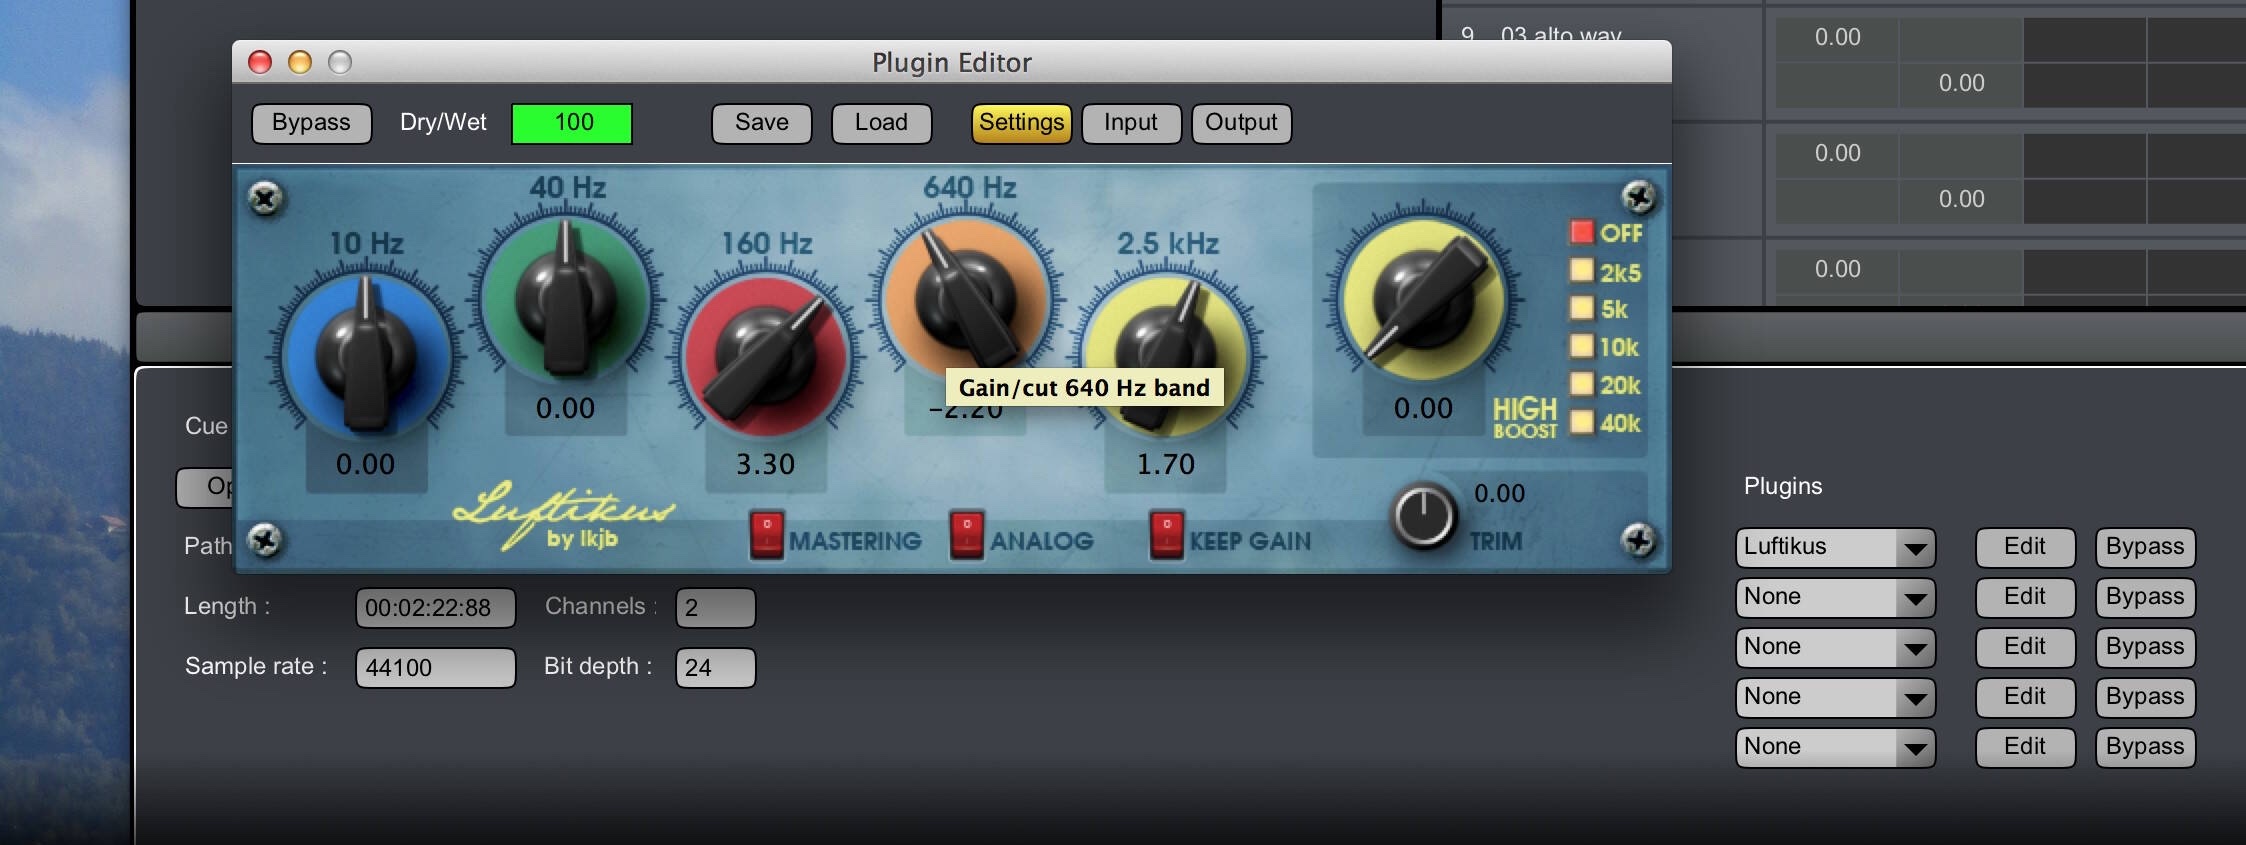
The plug-in editor features a tool bar, in which you can control common settings regardless of which particular plug-in is loaded. It includes :
- The Bypass button, which is replicated in the cue view, can be pressed to skip the plug-in DSP and pass through the unaltered audio. Bypass is active (i.e DSP is skipped) when the button is orange-lit.
- The Dry/Wet slider controls the mix between direct and processed sound. It is expressed in percentage of processed sound, i.e when at 100 all the output of the slot is processed sound, whereas at 0 all the output of the slot is the unprocessed slot input.
- The Save and Load buttons allows to save and restore plug-in presets to/from preset files.
- The Settings, Input and Output buttons are used to select the mode of the editor. The currently selected mode button is yellow-lit. When Settings is selected, the editor shows the custom settings of the plug-in. When Input or Output is selected, the editor shows the input or output patches of the slot. These patches are matrices, very much the same kind as cues’ matrices, that allow to mix the inputs (respectively outputs) of the slot to the inputs (respectively outputs) of the plug-in. Indeed the plug-in input/output count is not necessarily the same as the cue’s channel count.
3.2 - Group Cues
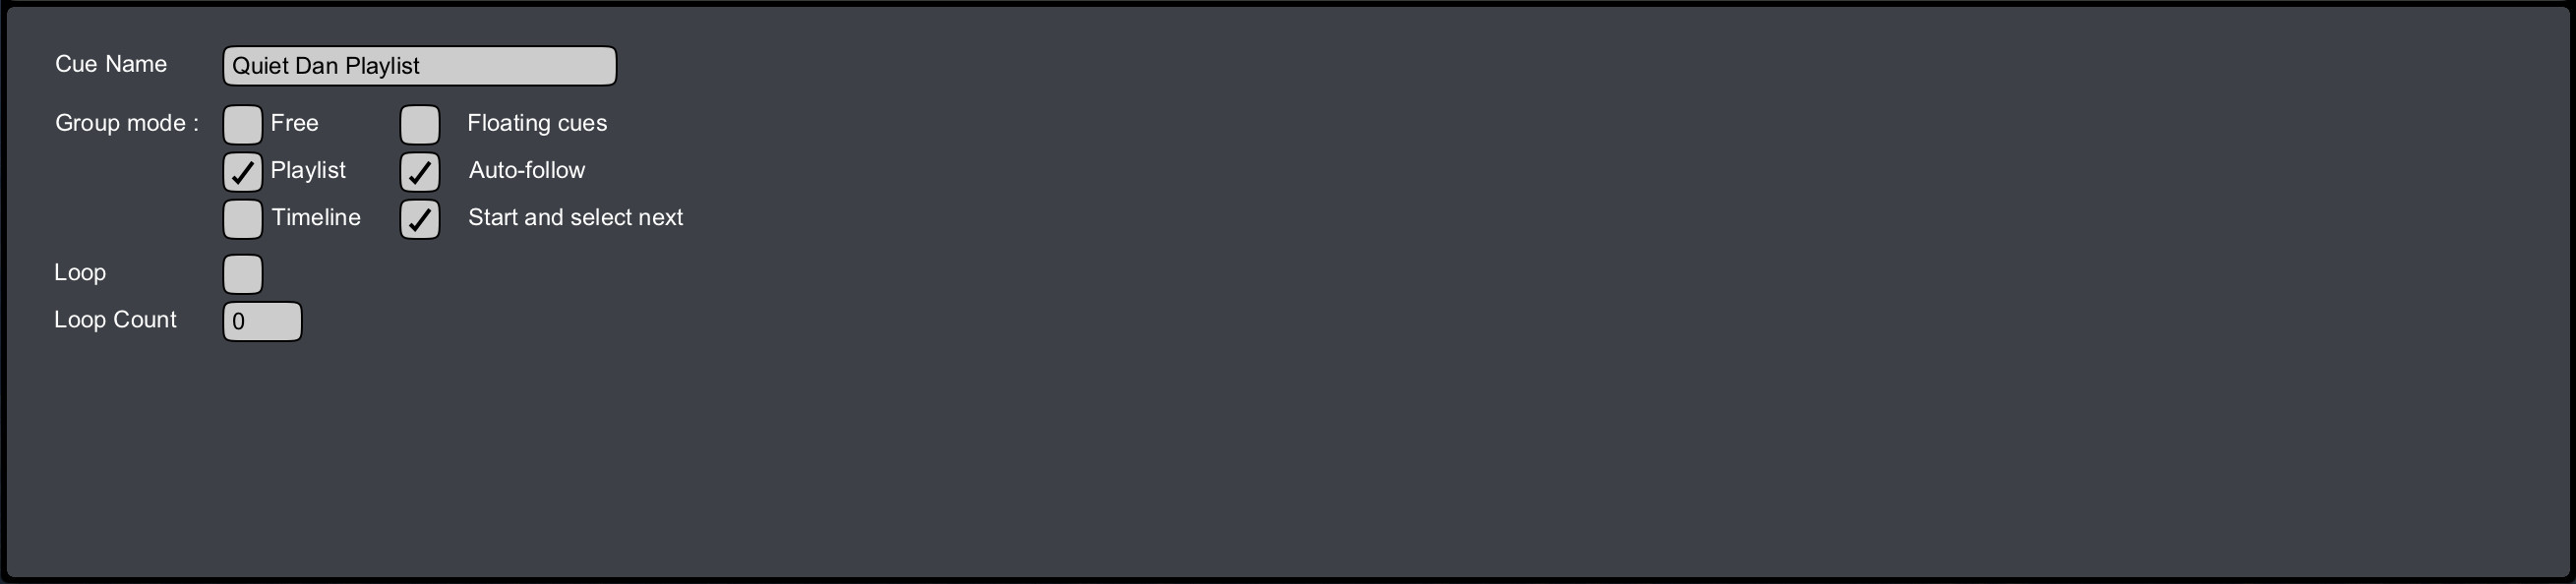
Group cues provide the core mechanism for organizing flexible, semi-automatic cuelists. As the name name imply, they allow to group cues, but moreover, they provide a mean to bind several cues to a common time frame and express their individual position in that time frame.
When you insert a Group cue in the cuelist, it appears with a rounded outline. If you now insert a cue while the group cue is selected, the new cue is added as a “child” of the group cue, and the outline is expanded to encompass the child cue. You can create other children cues when the selected cue is inside the outline, or move cues in and out the group. Group cues can be inserted inside another group to create complex hierarchical structures. Group cues can be “collapsed” by clicking on the - sign next to the group name : all children cues will be hidden inside the group cue, allowing to treat complex sequences as one single cue.
Below the cue name is a group of three radio buttons labeled Group Mode. These determine what kind of timing relation exists whithin the group.
Free mode
Free mode is indicated by a white outline in the cuelist. In this mode there is no synchronisation between the cues inside the group. When the Group cue is started, the first child cue will start. Children cues can be manually started or stopped without interfering with their siblings. However, stopping the Group cue will stop all children cues. This mode can be useful to keep a pool of multiple cues to choose from during rehearsal : just make your currently tested cue the first of the group and collapse the group to treat it as a single cue. It can also provide a simple way of visually grouping cues of a scene inside the group outline.
Playlist mode
Playlist mode is indicated by a green outline in the cuelist. In this mode only one child cue is played at a time. When you select this mode, a > sign appears next to the first child cue : it is the playlist selector. You can move the selector by clicking on the desired cue in the selector column. When the playlist is started or stopped, the command is forwarded to the cue pointed by the playlist selector. You can also manually start a child cue, in which case the currently playing child will stop, then the manually started cue will take the selector and start.
If the Auto-follow option is checked, when a child cue is finished, the selector will move to the next cue and start.
Timeline mode
Timeline mode is indicated by a red outline in the cuelist. In this mode, all cues are bound to the same transport and will play according to their position in a common timeline. You can set the starting point of each child cue in that timeline in the Cue In field of the cuelist. Manually starting a cue will start the timeline at its Cue In point (thus keeping the synchronization with all children cues). Manually stopping a cue will stop all children cues.
Floating Cues
Floating cues is an option that allows to temporarily pull children cues out of their group’s normal flow. When Floating Cues is checked and you manually start a child cue, that cue is put in floating state, indicated by a blue ring in its status indicator in the cuelist, and removed from the group’s timing mechanism until the group and the floating cue finish or are stopped. It will neither interact with the group transport nor be influenced by it. That option can be used for working on one specific cue during the rehearsal without having to roll the whole group, but it can also be useful as a safeguard during the show, allowing you to trigger some cues earlier or later than initially planned, without messing with the other cues. In this sense it offers a degree of flexibility within a pre-established sequence, not seen in other players.
Start and select next option allows to select the first cue after the group when it is started. Default behavious selects the first cue in the group, unless the group is collapsed.
3.3 - Mix Cues
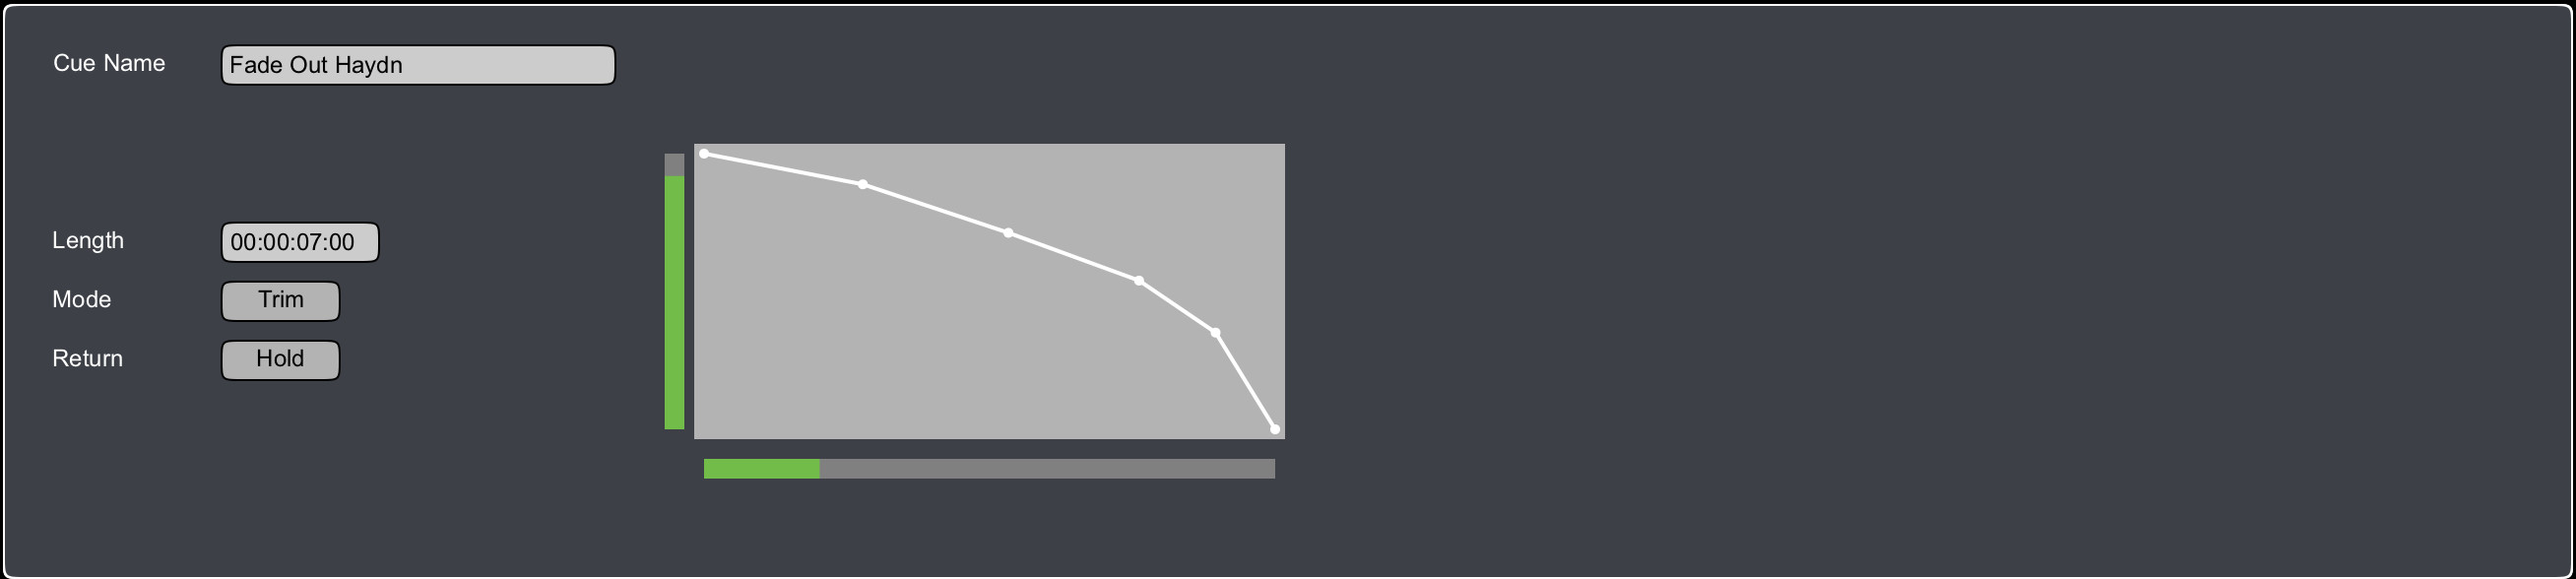
Mix Cues are used to control the levels of the matrix over time. When the selected cue is a Mix cue, you can set any number of cells in the matrix view to be targets for that cue. You can do so by clicking on a cell or by pressing Enter to target/untarget the selected cell. Targets will appear with a blue background.
The mix cue view displays a mix curve that will be applied to the target cells. You can edit this curve with the mouse in the following ways :
- Clicking in the mix curve area will create a mix point under the mouse cursor.
- You can click and drag a mix point to set it to the desired level and time. The precise coordinates of the mix point are displayed near it when you do so.
- You can suppress a mouse point by clicking on it while holding the
Altkey.
Left to the mix curve area is a time counter where you can enter the length of the mix cue (which sets the scale of the mix curve). Below that counter are two buttons that determine the mode and the return settings of the cue :
- When the mode is Abs, meaning “absolute”, whenever the mix cue is playing, the level of the mix curve is directly applied to the target cells, regardless of their default value.
- When the mode is Trim, the mix curve will apply a relative trim to the target cells’ values. For instance, if you manually set a cell value to -2dB, and then apply a mix curve that goes from -1dB to -5dB in Trim mode, the actual value of the cell will run from -3dB to -7dB over the course of the mix cue.
- When the return parameter is set to Snap, the mix cue will stop its effect on the target cells as soon as it is finished, meaning the cells will instantly “snap” to their default value.
- When the return parameter is set to Hold, the mix cue will continue to control any playing target cue even if it has itself reached its end, holding its last level until all target cues are finished playing.
3.4 - Control Cues
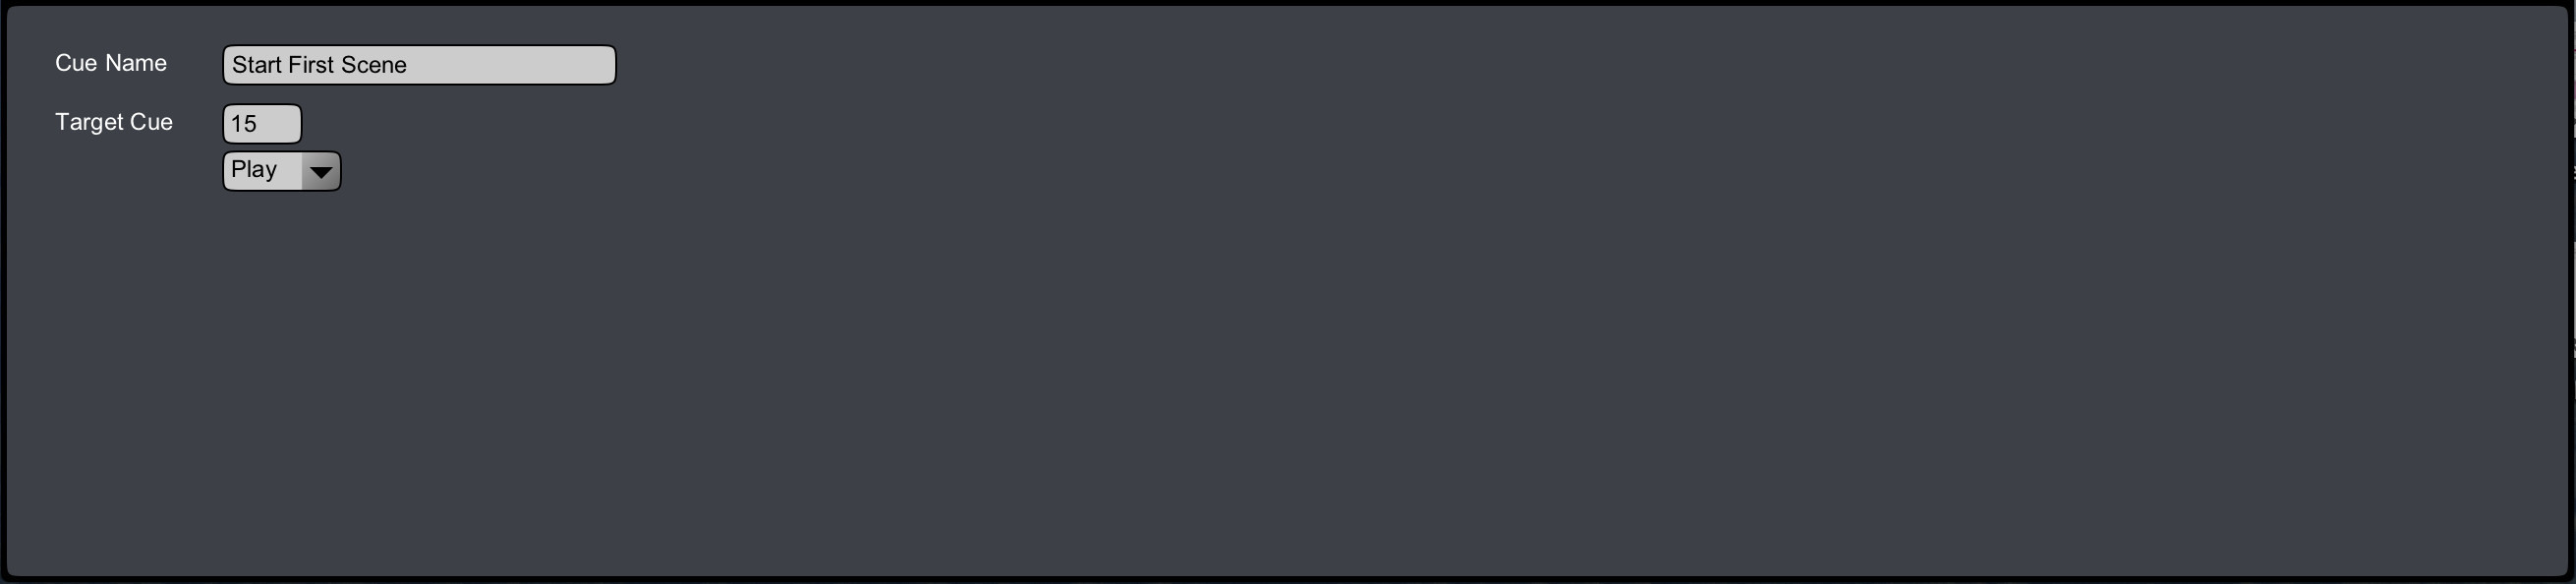
Control cues are very simple cues that can start or stop other cues. An example use case is stopping an audio cue after a fade : you could group the mix cue used to control the fade out, with a control cue that stop the audio cue right after the mix cue has finished playing.
The Control cue view displays a target box, where you can enter the number of the cue you whish to control. Then a pop-up menu allows you to select the command that will be applied to the target when the control cue is played.